Optimization Tips for Unity
Unity is a game engine that is popular not only among indie developers but big companies as well.
It features a user-friendly interface, a powerful Rendering pipeline, an easy-to-use component system, and lastly, it supports a vast array of platforms.
But with an easy-to-use interface, it's even easier to overcomplicate your game (for example by placing a lot of unnecessary objects, etc.), so it's important to have optimization in mind during the whole course of development.
Here are important tips for the 3 major categories (Rendering, Scripting, and Audio) that will help you improve the performance of your game:
Rendering
Tip 1: Keep the Objects with the Renderer component unscaled
Unscaled objects are those that have a scale of (1, 1, 1). In that case, Unity does not have to do additional calculations to rescale the object in each frame.
Example: Let's say you have a model of a house that is too big or too small for your level. The natural thing to do is to scale it like this:

Most of the time it's Ok to scale the object in the Scene view, but if you plan to have a lot of duplicated instances of that object, it's preferable to change the scale in the Import Settings.
The first thing you need to do is to scale the model until it fits your needs (ex. the building above was scaled from (1, 1, 1) to (0.49482, 0.49482, 0.49482)), then select the model in the Project view and in the Import Settings note the Scale Factor (Usually it's either 1 or 0.1).
Set the new value, which should equal the default scale factor multiply by the new scale (In my case it's 1 x 0.49482 = 0.49482), then hit Apply. Now go back to the model in the scene view and set the scale back to (1, 1, 1).
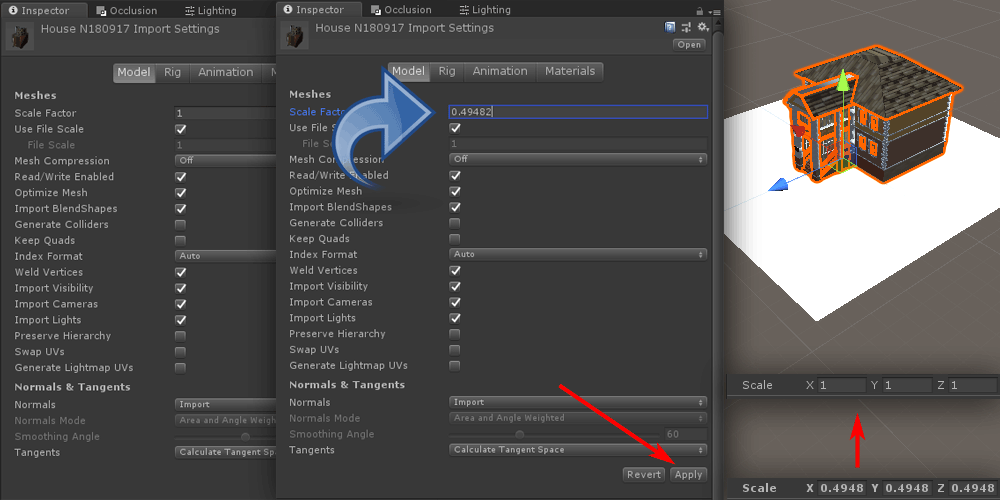
The object is now scaled the way you need while preserving the default (1, 1, 1) scale.
This tip is especially important for animated objects that use SkinnedMeshRenderer as this component is more expensive to render, and having a scale of (1, 1, 1) simplifies the rendering process.
Tip 2: Use as few lights as possible
There are 3 types of lights in Unity (Directional light, Point light, and Spotlight). In terms of performance Directional light is the cheapest for rendering, then Point, and lastly the Spotlight.
Generally, you don't want to have more than 1 directional light per scene, and for the spot and point lights try to have as few as possible (or none at all).
In terms of real-time shadows, while it enhances the visual aspect of the game, it has a high-performance overhead so generally, it is better to disable them or bake them into lightmaps and light probes.
Tip 3: Use Transparent Shaders with caution
Only use Transparent or Particle Shaders on surfaces that need to be transparent (ex. Fences, Smoke Particles, etc.)
Objects with transparency require an additional rendering pass which could reduce performance, especially on platforms with limited resources, such as Mobile or Web.
Scripting
Tip 1: Always cache component references
You should always cache component references if you plan to access them every Update.
For example, check the script below:
Bad
using UnityEngine;

public class Script1 : MonoBehaviour
{
    float someValue = 0;

    // Update is called once per frame
    void Update()
    {
        someValue = GetComponent<Script2>().someValue2;
    }
}
Here we have Script1 which gets the variable "someValue2" from Script2 and assigns it to a local variable.
Now, calling just one GetComponent each frame won't have any impact on performance, however, you should adopt a habit of caching the components that will be used frequently.
There are two ways to cache a component in a script, either create a public variable and assign it in Inspector view, or create a private variable and assign it from Start or Awake. Check the example below:
Good
using UnityEngine;

public class Script1 : MonoBehaviour
{

    float someValue = 0;

    Script2 script2Cached;

    // Use this for initialization
    void Start()
    {
        script2Cached = GetComponent<Script2>();
    }

    // Update is called once per frame
    void Update()
    {
        someValue = script2Cached.someValue2;
    }
}
Much better, Script2 can now be accessed each Update without performance overhead.
Do the same for built-in components, such as BoxCollider, Rigidbody, etc. (except Transform and GameObject, those are already cached by default so you can access them right away).
Tip 2: Use SendMessage with caution
SendMessage lets you call a specific function (if exists) on every MonoBehaviour that is attached to a game object.
For example, when you shoot a weapon in the game you can quickly inflict damage when the bullet hits the enemy, without the need to use GetComponent and other extra stuff.
However, this method should not be called too frequently as it's quite compute-intensive.
Tip 3: Use GameObject.Find and GameObject.FindWithTag with caution
GameObject.Find, GameObject.FindWithTag and GameObject.FindGameObjectsWithTag lets you quickly search for the objects in the Scene. These methods are much slower than GetComponent and should only be used during initialization.
Tip 4: Avoid using OnGUI
Historically OnGUI was the only way to make menus in Unity. But since then, an alternative was added called UI Canvas which is much better in terms of performance and offers a lot more functionality.
Nevertheless, OnGUI still remains a viable way to make UI in Unity and if you absolutely need to use it, keep in mind that OnGUI is called at least twice per frame (twice as much as Update and LateUpdate) so do not use it for any calculations besides UI.
One thing you can do is to have a separate script that only has OnGUI in it and enable/disable it when needed.
For example:
UIScript.cs
using UnityEngine;

public class UIScript : MonoBehaviour {

    void OnGUI()
    {
        if(GUI.Button(new Rect(5, 5, 125, 25), "Button 1"))
        {
            //Button 1 was pressed, Do Something
        }
        if (GUI.Button(new Rect(140, 5, 125, 25), "Button 2"))
        {
            //Button 2 was pressed, Do Something
        }
    }
}
Script1.cs
using UnityEngine;

public class Script1 : MonoBehaviour
{

    UIScript uiScript;

    // Use this for initialization
    void Start()
    {
        uiScript = GetComponent<UIScript>();
        uiScript.enabled = false;
    }

    // Update is called once per frame
    void Update()
    {
        if (Input.GetKeyDown(KeyCode.Tab))
        {
            //toggle UIScript when Tab is pressed
            uiScript.enabled = !uiScript.enabled;
        }
    }
}
Both UIScript and Script1 are attached to the same GameObject. Script1 controls when to show the menu.
When the player presses Tab the UIScript is enabled, showing the buttons. Pressing Tab again deactivates it, hiding the buttons.
While UIScript is deactivated, the OnGUI method is not called which in turn improves performance.
Tip 5: Use Profiler
Profiler is one of the most important tools when it comes to identifying bottlenecks and fps drops, making it easier to find the exact cause of the low performance.
Audio
Audio Clips can be optimized by making sure their Import Settings are correct.
Optimal Audio Import Settings will depend on the audio length, play frequency, and target platform.