Unity How to Make Mobile Touch Controls
Controls are one of the most important parts of a video game, and no surprise, it's what allows players to interact with the game world.
Game controls are signals that are sent through hardware interaction (mouse/keyboard, controller, touchscreen, etc.) which are then processed by the game code, applying certain actions.
PCs and Gaming Consoles have physical buttons that can be pressed, however, modern mobile devices have only a few physical buttons, the rest of the interaction is done through touch gestures, which means game buttons need to be displayed on the screen. That's why when creating a mobile game, it's important to find a balance between having all the buttons on the screen while keeping it user-friendly and clutter-free.

In this tutorial, I will be showing how to create fully-featured (Joysticks and Buttons) mobile controls in Unity using UI Canvas.
Step 1: Create All The Necessary Scripts
This tutorial features 2 scripts, SC_ClickTracker.cs, and SC_MobileControls.cs. The first script will listen to the click events and the second script will read the values generated from the events.
SC_ClickTracker.cs
using System.Collections;
using System.Collections.Generic;
using UnityEngine;
using UnityEngine.EventSystems;

#if UNITY_EDITOR
using UnityEditor;
#endif

public class SC_ClickTracker : MonoBehaviour, IPointerDownHandler, IDragHandler, IPointerUpHandler
{
    public string buttonName = ""; //This should be an unique name of the button
    public bool isJoystick = false;
    public float movementLimit = 1; //How far the joystick can be moved (n x Joystick Width)
    public float movementThreshold = 0.1f; //Minimum distance (n x Joystick Width) that the Joystick need to be moved to trigger inputAxis (Must be less than movementLimit)

    //Reference variables
    RectTransform rt;
    Vector3 startPos;
    Vector2 clickPos;

    //Input variables
    Vector2 inputAxis = Vector2.zero;
    bool holding = false;
    bool clicked = false;

    void Start()
    {
        //Add this button to the list
        SC_MobileControls.instance.AddButton(this);

        rt = GetComponent<RectTransform>();
        startPos = rt.anchoredPosition3D;
    }

    //Do this when the mouse is clicked over the selectable object this script is attached to.
    public void OnPointerDown(PointerEventData eventData)
    {
        //Debug.Log(this.gameObject.name + " Was Clicked.");

        holding = true;

        if (!isJoystick)
        {
            clicked = true;
            StartCoroutine(StopClickEvent());
        }
        else
        {
            //Initialize Joystick movement
            clickPos = eventData.pressPosition;
        }
    }

    WaitForEndOfFrame waitForEndOfFrame = new WaitForEndOfFrame();

    //Wait for next update then release the click event
    IEnumerator StopClickEvent()
    {
        yield return waitForEndOfFrame;

        clicked = false;
    }

    //Joystick movement
    public void OnDrag(PointerEventData eventData)
    {
        //Debug.Log(this.gameObject.name + " The element is being dragged");

        if (isJoystick)
        {
            Vector3 movementVector = Vector3.ClampMagnitude((eventData.position - clickPos) / SC_MobileControls.instance.canvas.scaleFactor, (rt.sizeDelta.x * movementLimit) + (rt.sizeDelta.x * movementThreshold));
            Vector3 movePos = startPos + movementVector;
            rt.anchoredPosition = movePos;

            //Update inputAxis
            float inputX = 0;
            float inputY = 0;
            if (Mathf.Abs(movementVector.x) > rt.sizeDelta.x * movementThreshold)
            {
                inputX = (movementVector.x - (rt.sizeDelta.x * movementThreshold * (movementVector.x > 0 ? 1 : -1))) / (rt.sizeDelta.x * movementLimit);
            }
            if (Mathf.Abs(movementVector.y) > rt.sizeDelta.x * movementThreshold)
            {
                inputY = (movementVector.y - (rt.sizeDelta.x * movementThreshold * (movementVector.y > 0 ? 1 : -1))) / (rt.sizeDelta.x * movementLimit);
            }
            inputAxis = new Vector2(inputX, inputY);
        }
    }

    //Do this when the mouse click on this selectable UI object is released.
    public void OnPointerUp(PointerEventData eventData)
    {
        //Debug.Log(this.gameObject.name + " The mouse click was released");

        holding = false;

        if (isJoystick)
        {
            //Reset Joystick position
            rt.anchoredPosition = startPos;
            inputAxis = Vector2.zero;
        }
    }

    public Vector2 GetInputAxis()
    {
        return inputAxis;
    }

    public bool GetClickedStatus()
    {
        return clicked;
    }

    public bool GetHoldStatus()
    {
        return holding;
    }
}

#if UNITY_EDITOR
//Custom Editor
[CustomEditor(typeof(SC_ClickTracker))]
public class SC_ClickTracker_Editor : Editor
{
    public override void OnInspectorGUI()
    {
        SC_ClickTracker script = (SC_ClickTracker)target;

        script.buttonName = EditorGUILayout.TextField("Button Name", script.buttonName);
        script.isJoystick = EditorGUILayout.Toggle("Is Joystick", script.isJoystick);
        if (script.isJoystick)
        {
            script.movementLimit = EditorGUILayout.FloatField("Movement Limit", script.movementLimit);
            script.movementThreshold = EditorGUILayout.FloatField("Movement Threshold", script.movementThreshold);
        }
    }
}
#endif
SC_MobileControls.cs
using System.Collections;
using System.Collections.Generic;
using UnityEngine;

public class SC_MobileControls : MonoBehaviour
{
    [HideInInspector]
    public Canvas canvas;
    List<SC_ClickTracker> buttons = new List<SC_ClickTracker>();

    public static SC_MobileControls instance;

    void Awake()
    {
        //Assign this script to static variable, so it can be accessed from other scripts. Make sure there is only one SC_MobileControls in the Scene.
        instance = this;

        canvas = GetComponent<Canvas>();
    }

    public int AddButton(SC_ClickTracker button)
    {
        buttons.Add(button);

        return buttons.Count - 1;
    }

    public Vector2 GetJoystick(string joystickName)
    {
        for(int i = 0; i < buttons.Count; i++)
        {
            if(buttons[i].buttonName == joystickName)
            {
                return buttons[i].GetInputAxis();
            }
        }

        Debug.LogError("Joystick with a name '" + joystickName + "' not found. Make sure SC_ClickTracker is assigned to the button and the name is matching.");

        return Vector2.zero;
    }

    public bool GetMobileButton(string buttonName)
    {
        for (int i = 0; i < buttons.Count; i++)
        {
            if (buttons[i].buttonName == buttonName)
            {
                return buttons[i].GetHoldStatus();
            }
        }

        Debug.LogError("Button with a name '" + buttonName + "' not found. Make sure SC_ClickTracker is assigned to the button and the name is matching.");

        return false;
    }

    public bool GetMobileButtonDown(string buttonName)
    {
        for (int i = 0; i < buttons.Count; i++)
        {
            if (buttons[i].buttonName == buttonName)
            {
                return buttons[i].GetClickedStatus();
            }
        }

        Debug.LogError("Button with a name '" + buttonName + "' not found. Make sure SC_ClickTracker is assigned to the button and the name is matching.");

        return false;
    }
}
Step 2: Set Up Mobile Controls
- Create a new Canvas (GameObject -> UI -> Canvas)
- Change 'UI Scale Mode' in Canvas Scaler to 'Scale With Screen Size' and change Reference Resolution to the one you're working with (in my case it's 1000 x 600)
- Attach the SC_MobileControls script to Canvas Object
- Right-click on Canvas Object -> UI -> Image
- Rename the newly created Image to "JoystickLeft"
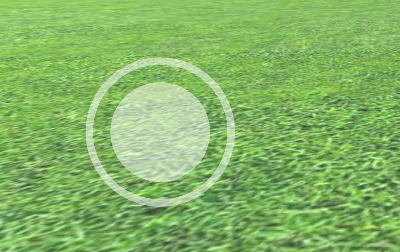
- Change "JoystickLeft" Sprite to an empty circle (don't forget to change Texture Type to 'Sprite (2D and UI)' after importing it to Unity)

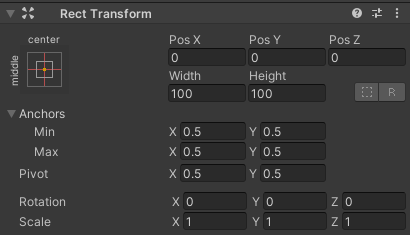
- Set "JoystickLeft" Rect Transform values the same as in the screenshot below:

- In the Image component, set the Color alpha to 0.5 to make the sprite slightly transparent:

- Duplicate the "JoystickLeft" Object and rename it to "JoystickLeftButton"
- Move "JoystickLeftButton" inside the "JoystickLeft" Object
- Change the "JoystickLeftButton" Sprite to a filled circle:

- Set "JoystickLeftButton" Rect Transform values the same as in the screenshot below:
- Add Button component to "JoystickLeftButton"
- In the Button component change Transition to 'None'
- Attach the SC_ClickTracker script to "JoystickLeftButton"
- In SC_ClickTracker set the Button Name to any unique name (in my case I set it to 'JoystickLeft') and enable the 'Is Joystick' checkbox.

The Joystick button is ready. You can have any number of Joysticks (In my case I will have 2, one on the left to control the movement and one on the right to control the rotation).
- Duplicate "JoystickLeft" and rename it to "JoystickRight"
- Expand "JoystickRight" and rename "JoystickLeftButton" to "JoystickRightButton"
- Set "JoystickRight" Rect Transform values the same as in the screenshot below:

- Select the "JoystickRightButton" Object and in SC_ClickTracker change Button Name to 'JoystickRight'
The second Joystick is ready.
Now let's create a regular button:
- Right-click on Canvas Object -> UI -> Button
- Rename Button Object to "SprintButton"
- Change the "SprintButton" Sprite to a Circle with a bevel effect:

- Set "SprintButton" Rect Transform values the same as in the screenshot below:

- Change the "SprintButton" Image color alpha to 0.5
- Attach the SC_ClickTracker script to the "SprintButton" Object
- In SC_ClickTracker change the Button Name to 'Sprinting'
- Select Text Object inside "SprintButton" and change its text to 'Sprint', also change Font Size to 'Bold'

The button is ready.
We are going to create another button called "Jump":
- Duplicate the "SprintButton" Object and rename it to "JumpButton"
- Change "JumpButton" Pos Y value to 250
- In SC_ClickTracker change the Button Name to 'Jumping'
- Change Text inside "JumpButton" to 'Jump'
And the last button is "Action":
- Duplicate the "JumpButton" Object and rename it to "ActionButton"
- Change "ActionButton" Pos X value to -185
- In SC_ClickTracker change Button Name to 'Action'
- Change Text inside "ActionButton" to 'Action'
Step 3: Implement Mobile Controls
If you followed the steps above, you can now use these functions to implement the mobile controls in your script:
if(SC_MobileControls.instance.GetMobileButtonDown("BUTTON_NAME")){
	//Mobile button has been pressed one time, equivalent to if(Input.GetKeyDown(KeyCode...))
}

if(SC_MobileControls.instance.GetMobileButton("BUTTON_NAME")){
	//Mobile button is being held pressed, equivalent to if(Input.GetKey(KeyCode...))
}

//Get normalized direction of a on-screen Joystick
//Could be compared to: new Vector2(Input.GetAxis("Horizontal"), Input.GetAxis("Vertical")) or new Vector2(Input.GetAxis("Mouse X"), Input.GetAxis("Mouse Y"))
Vector2 inputAxis = SC_MobileControls.instance.GetJoystick("JOYSTICK_NAME");
As an example, I will be implementing mobile controls with an FPS Controller from this tutorial. Go follow that tutorial first, it's fairly simple.
If you followed that tutorial you would now have the "FPSPlayer" Object along with Canvas with mobile controls.
We will be preserving Desktop controls while also implementing the mobile controls, making it cross-platform:
- Open SC_FPSController script, scroll until line 28, and remove this part (removing that part will prevent the cursor from being locked and will allow clicking on mobile controls in Editor.):
        // Lock cursor
        Cursor.lockState = CursorLockMode.Locked;
Cursor.visible = false;- Scroll til line 39 and replace:
        bool isRunning = Input.GetKey(KeyCode.LeftShift);
        float curSpeedX = canMove ? (isRunning ? runningSpeed : walkingSpeed) * Input.GetAxis("Vertical") : 0;
float curSpeedY = canMove ? (isRunning ? runningSpeed : walkingSpeed) * Input.GetAxis("Horizontal") : 0;- With:
        bool isRunning = Input.GetKey(KeyCode.LeftShift) || SC_MobileControls.instance.GetMobileButton("Sprinting");
        float curSpeedX = canMove ? (isRunning ? runningSpeed : walkingSpeed) * (Input.GetAxis("Vertical") + SC_MobileControls.instance.GetJoystick("JoystickLeft").y) : 0;
float curSpeedY = canMove ? (isRunning ? runningSpeed : walkingSpeed) * (Input.GetAxis("Horizontal") + SC_MobileControls.instance.GetJoystick("JoystickLeft").x) : 0;- Scroll down till line 45 and replace:
if (Input.GetButton("Jump") && canMove && characterController.isGrounded)- With:
if ((Input.GetButton("Jump") || SC_MobileControls.instance.GetMobileButtonDown("Jumping")) && canMove && characterController.isGrounded)- Scroll down till line 68 and replace:
            rotationX += -Input.GetAxis("Mouse Y") * lookSpeed;
            rotationX = Mathf.Clamp(rotationX, -lookXLimit, lookXLimit);
            playerCamera.transform.localRotation = Quaternion.Euler(rotationX, 0, 0);
transform.rotation *= Quaternion.Euler(0, Input.GetAxis("Mouse X") * lookSpeed, 0);- With:
#if UNITY_IPHONE || UNITY_ANDROID || UNITY_EDITOR
            rotationX += -(SC_MobileControls.instance.GetJoystick("JoystickRight").y) * lookSpeed;
#else
            rotationX += -Input.GetAxis("Mouse Y") * lookSpeed;
#endif
            rotationX = Mathf.Clamp(rotationX, -lookXLimit, lookXLimit);
            playerCamera.transform.localRotation = Quaternion.Euler(rotationX, 0, 0);
#if UNITY_IPHONE || UNITY_ANDROID || UNITY_EDITOR
            transform.rotation *= Quaternion.Euler(0, SC_MobileControls.instance.GetJoystick("JoystickRight").x * lookSpeed, 0);
#else
            transform.rotation *= Quaternion.Euler(0, Input.GetAxis("Mouse X") * lookSpeed, 0);
#endif
Since the look movement will interfere with the joystick testing in Editor, we're using #if for platform-specific compilation to separate mobile logic from the rest of the platforms.
The Mobile FPS Controller is now ready, let's test it:
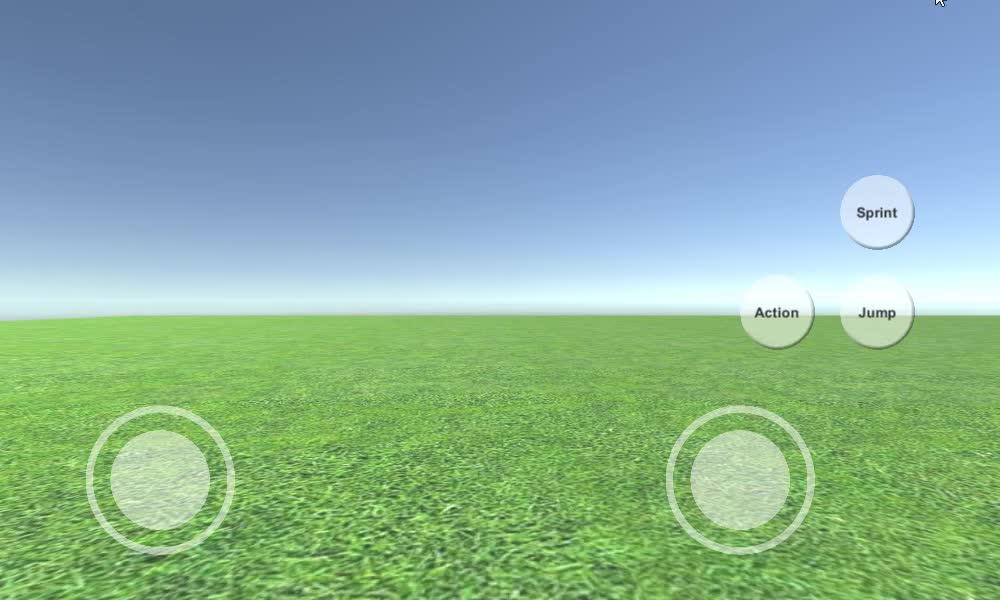
As you can see, all Joysticks and Buttons are functional (except the "Action" button, which wasn't implemented due to not having a suitable feature for it).