Procedural World Generation in Unity
The world generation in Unity refers to the process of creating or procedurally generating virtual worlds, terrains, landscapes, or environments within the Unity game engine. This technique is commonly used in various types of games, such as open-world games, RPGs, simulations, and more, to dynamically create vast and diverse game worlds.
Unity provides a flexible framework and a wide range of tools and APIs for implementing these world-generation techniques. One can write custom scripts using C# to generate and manipulate the game world or utilize Unity built-in features like the Terrain system, noise functions, and scripting interfaces to achieve the desired results. Additionally, there are also third-party assets and plugins available on the Unity Asset Store that can assist in world generation tasks.
There are several approaches to world generation in Unity, and the choice depends on the specific requirements of the game. Here are a few commonly used methods:
- Procedural Terrain Generation with Perlin Noise
- Cellular Automata
- Voronoi Diagrams
- Procedural Object Placement
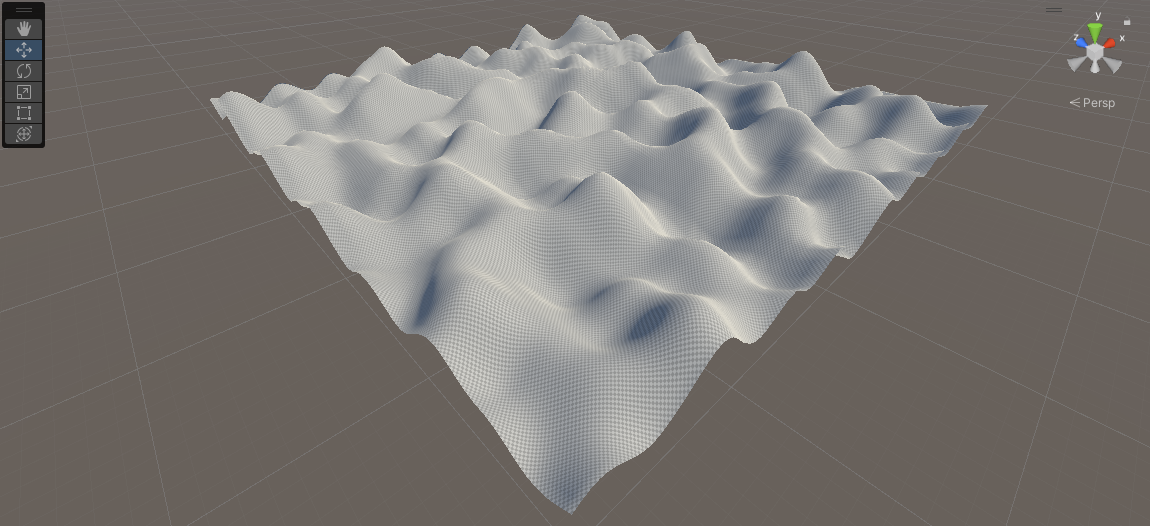
Procedural Terrain Generation with Perlin Noise
Procedural terrain generation in Unity can be achieved using various algorithms and techniques. One popular approach is to use Perlin noise to generate the height map and then apply various texturing and foliage techniques to create a realistic or stylized terrain.
Perlin noise is a type of gradient noise developed by Ken Perlin. It generates a smooth, continuous pattern of values that appear random but have a coherent structure. Perlin noise is widely used for creating natural-looking terrains, clouds, textures, and other organic shapes.
In Unity, one can use the function 'Mathf.PerlinNoise()' to generate Perlin noise. It takes two coordinates as input and returns a value between 0 and 1. By sampling Perlin noise at different frequencies and amplitudes, it's possible to create different levels of detail and complexity in the procedural content.
Here's an example of how to implement this in Unity:
- In the Unity Editor, go to "GameObject -> 3D Object -> Terrain". This will create a default terrain in the scene.
- Create a new C# script called "TerrainGenerator" and attach it to the terrain object. Here's an example script that generates a procedural terrain using Perlin noise:
using UnityEngine;

public class TerrainGenerator : MonoBehaviour
{
    public int width = 512;       // Width of the terrain
    public int height = 512;      // Height of the terrain
    public float scale = 10f;     // Scale of the terrain
    public float offsetX = 100f;  // X offset for noise
    public float offsetY = 100f;  // Y offset for noise
    public float noiseIntensity = 0.1f; //Intensity of the noise

    private void Start()
    {
        Terrain terrain = GetComponent<Terrain>();

        // Create a new instance of TerrainData
        TerrainData terrainData = new TerrainData();

        // Set the heightmap resolution and size of the TerrainData
        terrainData.heightmapResolution = width;
        terrainData.size = new Vector3(width, 600, height);

        // Generate the terrain heights
        float[,] heights = GenerateHeights();
        terrainData.SetHeights(0, 0, heights);

        // Assign the TerrainData to the Terrain component
        terrain.terrainData = terrainData;
    }

    private float[,] GenerateHeights()
    {
        float[,] heights = new float[width, height];

        for (int x = 0; x < width; x++)
        {
            for (int y = 0; y < height; y++)
            {
                // Generate Perlin noise value for current position
                float xCoord = (float)x / width * scale + offsetX;
                float yCoord = (float)y / height * scale + offsetY;
                float noiseValue = Mathf.PerlinNoise(xCoord, yCoord);

                // Set terrain height based on noise value
                heights[x, y] = noiseValue * noiseIntensity;
            }
        }

        return heights;
    }
}- Attach the "TerrainGenerator" script to the Terrain object in the Unity Editor.
- In the Inspector window for the terrain object, adjust the width, height, scale, offsets, and noise intensity to tweak the generated terrain's appearance.
- Press the Play button in the Unity Editor, and the procedural terrain should then be generated based on the Perlin noise algorithm.
Note: This script generates a basic terrain height map using Perlin noise. To create more complex terrains modify the script to incorporate additional noise algorithms, apply erosion or smoothing techniques, add texturing, or place foliage and objects based on the terrain's features.
Cellular Automata
Cellular automata is a computational model that consists of a grid of cells, where each cell evolves based on a set of predefined rules and the states of its neighboring cells. It is a powerful concept used in various fields, including computer science, mathematics, and physics. Cellular automata can exhibit complex behavior patterns emerging from simple rules, making them useful for simulating natural phenomena and generating procedural content.
The basic theory behind cellular automata involves the following elements:
- Grid: A grid is a collection of cells arranged in a regular pattern, such as a square or hexagonal lattice. Each cell can have a finite number of states.
- Neighbors: Each cell has neighboring cells, which are typically its immediate adjacent cells. The neighborhood can be defined based on different connectivity patterns, such as von Neumann (up, down, left, right) or Moore (including diagonal) neighborhoods.
- Rules: The behavior of each cell is determined by a set of rules that specify how it evolves based on its current state and the states of its neighboring cells. These rules are typically defined using conditional statements or lookup tables.
- Update: The cellular automaton evolves by updating the state of each cell simultaneously according to the rules. This process is repeated iteratively, creating a sequence of generations.
Cellular automata have various real-world applications, including:
- Simulation of Natural Phenomena: Cellular automata can simulate the behavior of physical systems, such as fluid dynamics, forest fires, traffic flow, and population dynamics. By defining appropriate rules, cellular automata can capture the emergent patterns and dynamics observed in real-world systems.
- Procedural Content Generation: Cellular automata can be used to generate procedural content in games and simulations. For example, they can be employed to create terrain, cave systems, vegetation distribution, and other organic structures. Complex and realistic environments can be generated by specifying rules that govern the growth and interaction of cells.
Here's a simple example of implementing a basic cellular automaton in Unity to simulate the game of life:
using UnityEngine;

public class CellularAutomaton : MonoBehaviour
{
    public int width = 50;
    public int height = 50;
    public float cellSize = 1f;
    public float updateInterval = 0.1f;
    public Renderer cellPrefab;

    private bool[,] grid;
    private Renderer[,] cells;
    private float timer = 0f;
    private bool[,] newGrid;

    private void Start()
    {
        InitializeGrid();
        CreateCells();
    }

    private void Update()
    {
        timer += Time.deltaTime;

        if (timer >= updateInterval)
        {
            UpdateGrid();
            UpdateCells();
            timer = 0f;
        }
    }

    private void InitializeGrid()
    {
        grid = new bool[width, height];
        newGrid = new bool[width, height];

        // Initialize the grid randomly
        for (int x = 0; x < width; x++)
        {
            for (int y = 0; y < height; y++)
            {
                grid[x, y] = Random.value < 0.5f;
            }
        }
    }

    private void CreateCells()
    {
        cells = new Renderer[width, height];

        // Create a GameObject for each cell in the grid
        for (int x = 0; x < width; x++)
        {
            for (int y = 0; y < height; y++)
            {
                Vector3 position = new Vector3(x * cellSize, 0f, y * cellSize);
                Renderer cell = Instantiate(cellPrefab, position, Quaternion.identity);
                cell.material.color = Color.white;
                cells[x, y] = cell;
            }
        }
    }

    private void UpdateGrid()
    {
        // Apply the rules to update the grid
        for (int x = 0; x < width; x++)
        {
            for (int y = 0; y < height; y++)
            {
                int aliveNeighbors = CountAliveNeighbors(x, y);

                if (grid[x, y])
                {
                    // Cell is alive
                    if (aliveNeighbors < 2 || aliveNeighbors > 3)
                        newGrid[x, y] = false; // Die due to underpopulation or overpopulation
                    else
                        newGrid[x, y] = true; // Survive
                }
                else
                {
                    // Cell is dead
                    if (aliveNeighbors == 3)
                        newGrid[x, y] = true; // Revive due to reproduction
                    else
                        newGrid[x, y] = false; // Remain dead
                }
            }
        }

        grid = newGrid;
    }

    private void UpdateCells()
    {
        // Update the visual representation of cells based on the grid
        for (int x = 0; x < width; x++)
        {
            for (int y = 0; y < height; y++)
            {
                Renderer renderer = cells[x, y];
                renderer.sharedMaterial.color = grid[x, y] ? Color.black : Color.white;
            }
        }
    }

    private int CountAliveNeighbors(int x, int y)
    {
        int count = 0;

        for (int i = -1; i <= 1; i++)
        {
            for (int j = -1; j <= 1; j++)
            {
                if (i == 0 && j == 0)
                    continue;

                int neighborX = x + i;
                int neighborY = y + j;

                if (neighborX >= 0 && neighborX < width && neighborY >= 0 && neighborY < height)
                {
                    if (grid[neighborX, neighborY])
                        count++;
                }
            }
        }

        return count;
    }
}- Attach the "CellularAutomaton" script to a GameObject in the Unity scene and assign a cell prefab to the field 'cellPrefab' in the inspector.
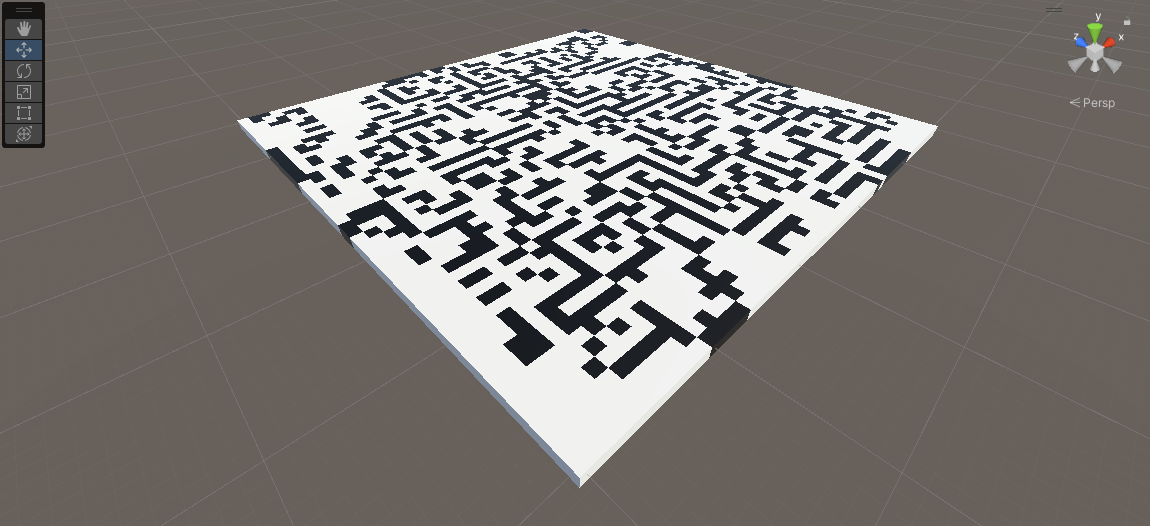
In this example, a grid of cells is represented by a boolean array, where 'true' indicates an alive cell and 'false' represents a dead cell. The rules of the game of life are applied to update the grid, and the visual representation of cells is updated accordingly. The 'CreateCells()' method creates a GameObject for each cell, and the method 'UpdateCells()' updates the color of each GameObject based on the grid state.
Note: This is just a basic example, and there are many variations and extensions to cellular automata that can be explored. The rules, cell behaviors, and grid configurations can be modified to create different simulations and generate various patterns and behaviors.
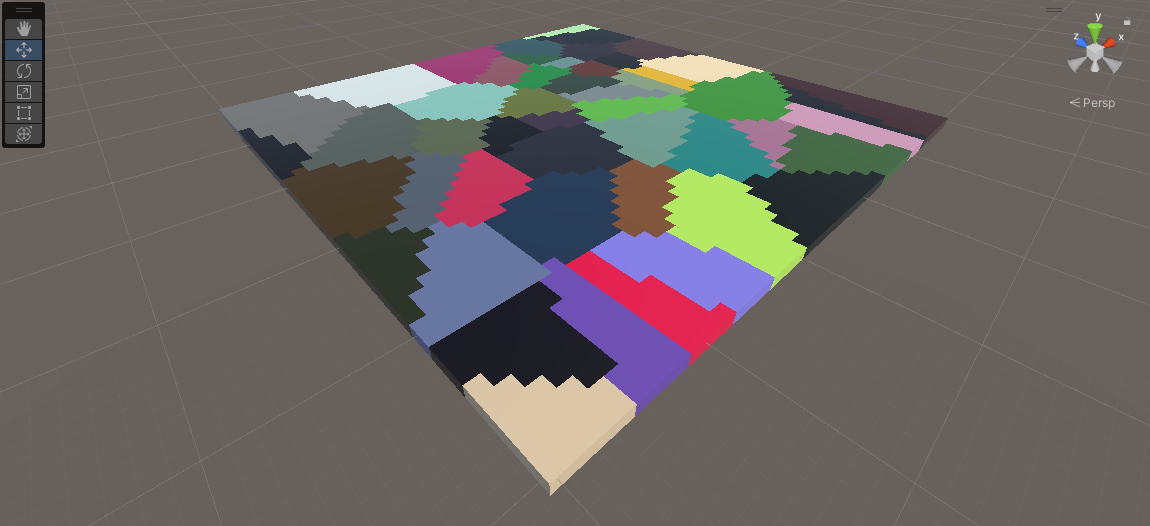
Voronoi Diagrams
Voronoi diagrams, also known as Voronoi tessellations or Voronoi partitions, are geometric structures that divide a space into regions based on proximity to a set of points called seeds or sites. Each region in a Voronoi diagram consists of all points in the space that are closer to a particular seed than to any other seed.
The basic theory behind Voronoi diagrams involves the following elements:
- Seeds/Sites: Seeds or sites are a set of points in the space. These points can be randomly generated or placed manually. Each seed represents a center point for a Voronoi region.
- Voronoi Cells/Regions: Each Voronoi cell or region corresponds to an area of the space that is closer to a particular seed than to any other seed. The boundaries of the regions are formed by the perpendicular bisectors of the line segments connecting neighboring seeds.
- Delaunay Triangulation: Voronoi diagrams are closely related to Delaunay triangulation. Delaunay triangulation is a triangulation of the seed points such that no seed is inside the circumcircle of any triangle. The Delaunay triangulation can be used to construct Voronoi diagrams, and vice versa.
Voronoi diagrams have various real-world applications, including:
- Procedural Content Generation: Voronoi diagrams can be used to generate procedural terrain, natural landscapes, and organic shapes. By using the seeds as control points and assigning attributes (such as elevation or biome type) to the Voronoi cells, realistic and varied environments can be created.
- Game Design: Voronoi diagrams can be used in game design to partition space for gameplay purposes. For example, in strategy games, Voronoi diagrams can be used to divide the game map into territories or zones controlled by different factions.
- Pathfinding and AI: Voronoi diagrams can aid in pathfinding and AI navigation by providing a representation of the space that allows for efficient calculation of the nearest seed or region. They can be used to define navigation meshes or influence maps for AI agents.
In Unity, there are several ways to generate and utilize Voronoi diagrams:
- Procedural Generation: Developers can implement algorithms to generate Voronoi diagrams from a set of seed points in Unity. Various algorithms, such as Fortune's algorithm or the Lloyd relaxation algorithm, can be used to construct Voronoi diagrams.
- Terrain Generation: Voronoi diagrams can be utilized in terrain generation to create diverse and realistic landscapes. Each Voronoi cell can represent a different terrain feature, such as mountains, valleys, or plains. Attributes like elevation, moisture, or vegetation can be assigned to each cell, resulting in a varied and visually appealing terrain.
- Map Partitioning: Voronoi diagrams can be employed to divide game maps into regions for gameplay purposes. It's possible to assign different attributes or properties to each region to create distinct gameplay zones. This can be useful for strategy games, territorial control mechanics, or level design.
There are Unity packages and assets available that provide Voronoi diagram functionality, making it easier to incorporate Voronoi-based features into Unity projects. These packages often include Voronoi diagram generation algorithms, visualization tools, and integration with the Unity rendering system.
Here's an example of generating a 2D Voronoi diagram in Unity using Fortune's algorithm:
using UnityEngine;
using System.Collections.Generic;

public class VoronoiDiagram : MonoBehaviour
{
    public int numSeeds = 50;
    public int diagramSize = 50;
    public GameObject seedPrefab;

    private List<Vector2> seeds = new List<Vector2>();
    private List<List<Vector2>> voronoiCells = new List<List<Vector2>>();

    private void Start()
    {
        GenerateSeeds();
        GenerateVoronoiDiagram();
        VisualizeVoronoiDiagram();
    }

    private void GenerateSeeds()
    {
        // Generate random seeds within the diagram size
        for (int i = 0; i < numSeeds; i++)
        {
            float x = Random.Range(0, diagramSize);
            float y = Random.Range(0, diagramSize);
            seeds.Add(new Vector2(x, y));
        }
    }

    private void GenerateVoronoiDiagram()
    {
        // Compute the Voronoi cells based on the seeds
        for (int i = 0; i < seeds.Count; i++)
        {
            List<Vector2> cell = new List<Vector2>();
            voronoiCells.Add(cell);
        }

        for (int x = 0; x < diagramSize; x++)
        {
            for (int y = 0; y < diagramSize; y++)
            {
                Vector2 point = new Vector2(x, y);
                int closestSeedIndex = FindClosestSeedIndex(point);
                voronoiCells[closestSeedIndex].Add(point);
            }
        }
    }

    private int FindClosestSeedIndex(Vector2 point)
    {
        int closestIndex = 0;
        float closestDistance = Vector2.Distance(point, seeds[0]);

        for (int i = 1; i < seeds.Count; i++)
        {
            float distance = Vector2.Distance(point, seeds[i]);
            if (distance < closestDistance)
            {
                closestDistance = distance;
                closestIndex = i;
            }
        }

        return closestIndex;
    }

    private void VisualizeVoronoiDiagram()
    {
        // Visualize the Voronoi cells by instantiating a sphere for each cell point
        for (int i = 0; i < voronoiCells.Count; i++)
        {
            List<Vector2> cell = voronoiCells[i];
            Color color = Random.ColorHSV();

            foreach (Vector2 point in cell)
            {
                Vector3 position = new Vector3(point.x, 0, point.y);
                GameObject sphere = Instantiate(seedPrefab, position, Quaternion.identity);
                sphere.GetComponent<Renderer>().material.color = color;
            }
        }
    }
}- To use this code, create a sphere prefab and assign it to the seedPrefab field in the Unity inspector. Adjust the numSeeds and diagramSize variables to control the number of seeds and the size of the diagram.
In this example, the VoronoiDiagram script generates a Voronoi diagram by randomly placing seed points within the specified diagram size. The method 'GenerateVoronoiDiagram()' computes the Voronoi cells based on the seed points, and the method 'VisualizeVoronoiDiagram()' instantiates a sphere GameObject at each point of the Voronoi cells, visualizing the diagram.
Note: This example provides a basic visualization of the Voronoi diagram, but it's possible to extend it further by adding additional features, such as connecting the cell points with lines or assigning different attributes to each cell for terrain generation or gameplay purposes.
Overall, Voronoi diagrams offer a versatile and powerful tool for generating procedural content, partitioning space, and creating interesting and varied environments in Unity.
Procedural Object Placement
Procedural object placement in Unity involves generating and placing objects in a scene algorithmically, rather than manually positioning them. It is a powerful technique used for various purposes, such as populating environments with trees, rocks, buildings, or other objects in a natural and dynamic manner.
Here's an example of procedural object placement in Unity:
using UnityEngine;

public class ObjectPlacement : MonoBehaviour
{
    public GameObject objectPrefab;
    public int numObjects = 50;
    public Vector3 spawnArea = new Vector3(10f, 0f, 10f);

    private void Start()
    {
        PlaceObjects();
    }

    private void PlaceObjects()
    {
        for (int i = 0; i < numObjects; i++)
        {
            Vector3 spawnPosition = GetRandomSpawnPosition();
            Quaternion spawnRotation = Quaternion.Euler(0f, Random.Range(0f, 360f), 0f);
            Instantiate(objectPrefab, spawnPosition, spawnRotation);
        }
    }

    private Vector3 GetRandomSpawnPosition()
    {
        Vector3 center = transform.position;
        Vector3 randomPoint = center + new Vector3(
            Random.Range(-spawnArea.x / 2, spawnArea.x / 2),
            0f,
            Random.Range(-spawnArea.z / 2, spawnArea.z / 2)
        );
        return randomPoint;
    }
}- To use this script, create an empty GameObject in the Unity scene and attach the "ObjectPlacement" script to it. Assign the object prefab and adjust the 'numObjects' and 'spawnArea' parameters in the inspector to fit the requirements. When running the scene, the objects will be placed procedurally within the defined spawn area.
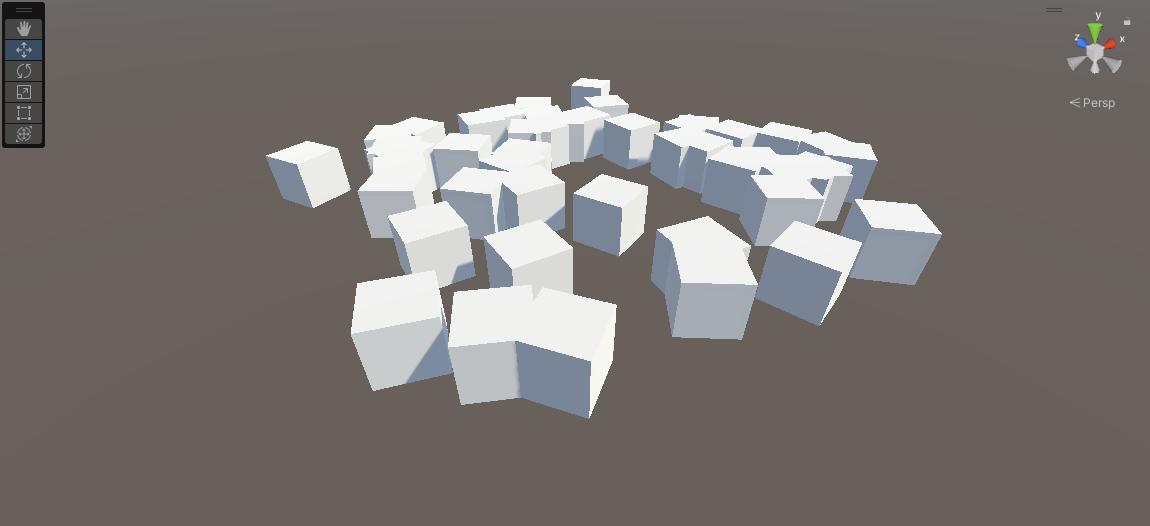
In this example, the 'ObjectPlacement' script is responsible for procedurally placing objects in the scene. The 'objectPrefab' field should be assigned with the prefab of the object to place. The 'numObjects' variable determines the number of objects to be placed, and the variable 'spawnArea' defines the area in which the objects will be randomly positioned.
The 'PlaceObjects()' method loops through the desired number of objects and generates random spawn positions within the defined spawn area. It then instantiates the object prefab at each random position with a random rotation.
Note: It's possible to further enhance this code by incorporating various placement algorithms, such as grid-based placement, density-based placement, or rules-based placement, depending on the specific requirements of the project.
Conclusion
Procedural generation techniques in Unity provide powerful tools for creating dynamic and immersive experiences. Whether it's generating terrains using Perlin noise or fractal algorithms, creating diverse environments with Voronoi diagrams, simulating complex behaviors with cellular automata, or populating scenes with procedurally placed objects, these techniques offer flexibility, efficiency, and endless possibilities for content generation. By leveraging these algorithms and integrating them into Unity projects, developers can achieve realistic terrain generation, lifelike simulations, visually appealing environments, and engaging gameplay mechanics. Procedural generation not only saves time and effort but also enables the creation of unique and ever-changing experiences that captivate players and bring virtual worlds to life.