How to Make Pixel Art Using Photoshop
Unlike regular art, pixel art consists of a per-pixel color fill, which results in a low level of detail. But despite that, it does not interfere with how many storylines it can communicate.
In this tutorial, I will be showing how to create a simple Pixel Art using Photoshop (I'll be using Photoshop Elements but the steps should be fairly similar for the full version of Photoshop).
You can also use this technique for game development, when creating level sprites or a game character.
So let's begin!
Step 1: Creating a New Image
- In Photoshop click File -> New -> Blank File...

- Set the Width and Height to something small (In my case I'll start by making a ground tile, so the Width and Height are set to 16)
- Set Color Mode to RGB Color then click Ok

- The new blank image will appear (You can Zoom in by pressing Ctrl and +)

- Select Pencil Tool and set its Size to 1 px and Opacity to 100%

Step 2: Painting the Pixels
- Now we are ready to paint (I will begin by making a ground tile with the grass on top)

![]()
As you can see the resulting image is quite small (I will get to how to make a bigger tile at the end of the article)
- Meanwhile, I repeated the same process for another 3 elements of my art (a House, a Fence, and a Tree)
![]()
![]()
![]()
- Now it's time to combine the images, here is the final result:
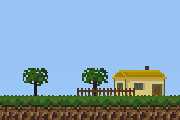
To scale the image without it losing pixelation you need to do the next steps:
- Go to Image -> Resize -> Image Size...

- Set the Width to a bigger value (In my case I'll set it to 784 px), the height should scale proportionally.
Now, if you click Ok the image will appear blurry, that's because we need to change the scaling algorithm to "Nearest Neighbor" like this:

And here is the scaled Image (Tip: Click the image to expand it):

Bonus: Filling the Pixel Area
Let's say you finished drawing your pixel character and need to fill the inside with a solid color.

Normally you do it with the Paint Bucket Tool, but you'll notice that some pixels are poking out:

To avoid this, we need to disable the Anti-aliasing in the Paint Bucket Tool:


Much better!