Make Tornado Physics in Unity
In this tutorial, we will be creating a Tornado simulation inside Unity.

Unity version used in this tutorial: Unity 2018.3.0f2 (64-bit)
Step 1: Create all the necessary scripts
This tutorial requires 2 scripts:
SC_Caught.cs
//This script is attached automatically to each Object caught in Tornado

using UnityEngine;

public class SC_Caught : MonoBehaviour
{
    private SC_Tornado tornadoReference;
    private SpringJoint spring;
    [HideInInspector]
    public Rigidbody rigid;

    // Use this for initialization
    void Start()
    {
        rigid = GetComponent<Rigidbody>();
    }

    // Update is called once per frame
    void Update()
    {
        //Lift spring so objects are pulled upwards
        Vector3 newPosition = spring.connectedAnchor;
        newPosition.y = transform.position.y;
        spring.connectedAnchor = newPosition;
    }

    void FixedUpdate()
    {
        //Rotate object around tornado center
        Vector3 direction = transform.position - tornadoReference.transform.position;
        //Project
        Vector3 projection = Vector3.ProjectOnPlane(direction, tornadoReference.GetRotationAxis());
        projection.Normalize();
        Vector3 normal = Quaternion.AngleAxis(130, tornadoReference.GetRotationAxis()) * projection;
        normal = Quaternion.AngleAxis(tornadoReference.lift, projection) * normal;
        rigid.AddForce(normal * tornadoReference.GetStrength(), ForceMode.Force);

        Debug.DrawRay(transform.position, normal * 10, Color.red);
    }

    //Call this when tornadoReference already exists
    public void Init(SC_Tornado tornadoRef, Rigidbody tornadoRigidbody, float springForce)
    {
        //Make sure this is enabled (for reentrance)
        enabled = true;

        //Save tornado reference
        tornadoReference = tornadoRef;

        //Initialize the spring
        spring = gameObject.AddComponent<SpringJoint>();
        spring.spring = springForce;
        spring.connectedBody = tornadoRigidbody;

        spring.autoConfigureConnectedAnchor = false;

        //Set initial position of the caught object relative to its position and the tornado
        Vector3 initialPosition = Vector3.zero;
        initialPosition.y = transform.position.y;
        spring.connectedAnchor = initialPosition;
    }

    public void Release()
    {
        enabled = false;
        Destroy(spring);
    }
}
SC_Tornado.cs
//Tornado script controls tornado physics

using System.Collections.Generic;
using UnityEngine;

public class SC_Tornado : MonoBehaviour
{
    [Tooltip("Distance after which the rotation physics starts")]
    public float maxDistance = 20;

    [Tooltip("The axis that the caught objects will rotate around")]
    public Vector3 rotationAxis = new Vector3(0, 1, 0);

    [Tooltip("Angle that is added to the object's velocity (higher lift -> quicker on top)")]
    [Range(0, 90)]
    public float lift = 45;

    [Tooltip("The force that will drive the caught objects around the tornado's center")]
    public float rotationStrength = 50;

    [Tooltip("Tornado pull force")]
    public float tornadoStrength = 2;

    Rigidbody r;

    List<SC_Caught> caughtObject = new List<SC_Caught>();

    // Start is called before the first frame update
    void Start()
    {
        //Normalize the rotation axis given by the user
        rotationAxis.Normalize();

        r = GetComponent<Rigidbody>();
        r.isKinematic = true;
    }

    void FixedUpdate()
    {
        //Apply force to caught objects
        for (int i = 0; i < caughtObject.Count; i++)
        {
            if(caughtObject[i] != null)
            {
                Vector3 pull = transform.position - caughtObject[i].transform.position;
                if (pull.magnitude > maxDistance)
                {
                    caughtObject[i].rigid.AddForce(pull.normalized * pull.magnitude, ForceMode.Force);
                    caughtObject[i].enabled = false;
                }
                else
                {
                    caughtObject[i].enabled = true;
                }
            }
        }
    }

    void OnTriggerEnter(Collider other)
    {
        if (!other.attachedRigidbody) return;
        if (other.attachedRigidbody.isKinematic) return;

        //Add caught object to the list
        SC_Caught caught = other.GetComponent<SC_Caught>();
        if (!caught)
        {
            caught = other.gameObject.AddComponent<SC_Caught>();
        }

        caught.Init(this, r, tornadoStrength);

        if (!caughtObject.Contains(caught))
        {
            caughtObject.Add(caught);
        }
    }

    void OnTriggerExit(Collider other)
    {
        //Release caught object
        SC_Caught caught = other.GetComponent<SC_Caught>();
        if (caught)
        {
            caught.Release();

            if (caughtObject.Contains(caught))
            {
                caughtObject.Remove(caught);
            }
        }
    }

    public float GetStrength()
    {
        return rotationStrength;
    }

    //The axis the caught objects rotate around
    public Vector3 GetRotationAxis()
    {
        return rotationAxis;
    }

    //Draw tornado radius circle in Editor
    void OnDrawGizmosSelected()
    {
        Vector3[] positions = new Vector3[30];
        Vector3 centrePos = transform.position;
        for (int pointNum = 0; pointNum < positions.Length; pointNum++)
        {
            // "i" now represents the progress around the circle from 0-1
            // we multiply by 1.0 to ensure we get a fraction as a result.
            float i = (float)(pointNum * 2) / positions.Length;

            // get the angle for this step (in radians, not degrees)
            float angle = i * Mathf.PI * 2;

            // the X & Y position for this angle are calculated using Sin & Cos
            float x = Mathf.Sin(angle) * maxDistance;
            float z = Mathf.Cos(angle) * maxDistance;

            Vector3 pos = new Vector3(x, 0, z) + centrePos;
            positions[pointNum] = pos;
        }

        Gizmos.color = Color.cyan;
        for (int i = 0; i < positions.Length; i++)
        {
            if (i == positions.Length - 1)
            {
                Gizmos.DrawLine(positions[0], positions[positions.Length - 1]);
            }
            else
            {
                Gizmos.DrawLine(positions[i], positions[i + 1]);
            }
        }
    }
}![]()
Step 2: Creating a Tornado
1. Create Tornado particles:
- Create a new GameObject (GameObject -> Create Empty) and name it "Tornado"
- Create another GameObject and name it "Particles", move it inside "Tornado" and change its position to (0, 0, 0)
- Add a ParticleSystem component to the "Particles" GameObject
- In Particle System enable these modules: Emission, Shape, Velocity over Lifetime, Color over Lifetime, Size over Lifetime, Rotation over Lifetime, External Forces, Renderer.

2. Assign the values for each Particle System module (Check Screenshots below):
Main (Particles) module:

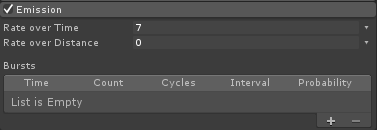
Emission module:
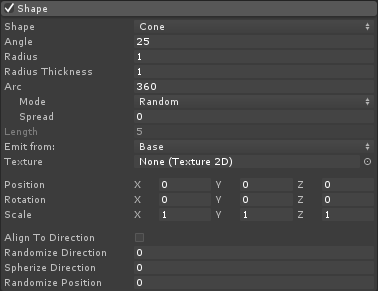
Shape module:
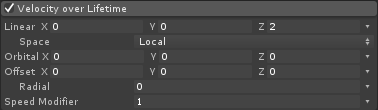
Velocity over Lifetime module:
Color over Lifetime module:
![]()

(2 Gray colors at each end and 2 White colors in the inner part)
Size over Lifetime module:

(Size over Lifetime uses a curve that looks like this):

(Size slightly goes down then goes up)
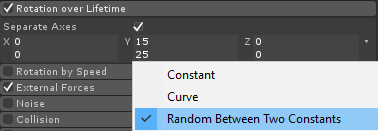
Rotation over Lifetime:
External Forces module:
This module does not need any changes, just leave the default values.
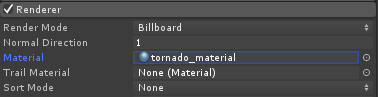
Renderer module:
For this module we only need to assign the following material:
- Create a new material and call it "tornado_material"
- Change its Shader to "Legacy Shaders/Particles/Alpha Blended"
- Assign the texture below to it (or click here):


- Assign the tornado_material to a Renderer module:
Now Tornado particles should look something like this:

But as you can see it does not look like a Tornado at all, that's because we have one more component to add, which is the Particle System Force Field, this component is needed to simulate the circular wind:
- Create a new GameObject and name it "ForceField"
- Move "ForceField" inside "Tornado" GameObject and change its position to (0, 0, 0)

- Add Particle System Force Field component to "ForceField"
- Change the values of the Force Field component to the same as in the screenshot below:

Now the particles should look something like this, which is much better:

3. Setting Up Tornado Physics
- Add Rigidbody and SC_Tornado components to "Tornado" GameObject

- Create a new GameObject and name it "Trigger"
- Move "Trigger" inside "Tornado" GameObject and change its position to (0, 10, 0) and change its scale to (60, 10, 60)
- Add MeshCollider component to "Trigger" GameObject, check the Convex and IsTrigger checkboxes, and change its Mesh to default Cylinder

The tornado is now ready!
To test it simply create a Cube and add a Rigidbody component, then place it inside the Trigger area.
Once you press Play the Cube should be pulled in by the Tornado:
