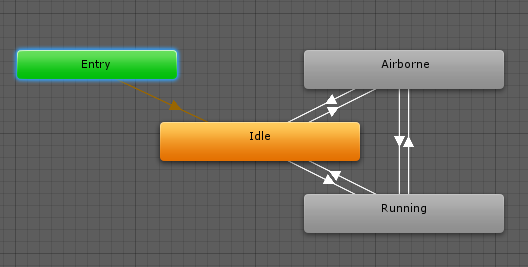
Introduction to State Machine in Unity
State machines are a fundamental concept in game development, and Unity provides a powerful toolset for implementing them. A state machine is a computational model consisting of a set of states, transitions between those states, and actions associated with each state or transition. In Unity, the state machine system is commonly used for controlling game character behavior, managing animations, handling user input, managing UI states, and more.
What is a State Machine
At its core, a state machine consists of two key elements: states and transitions.
States represent specific conditions or behaviors that an object or system can be in at any given time. For example, in a game character's state machine, there might be states such as idle, walking, running, jumping, or attacking. Each state defines a set of actions or behaviors associated with it.
public enum CharacterState
{
    Idle,
    Walking,
    Running,
    Jumping,
    Attacking
}

public CharacterState currentState;
State Machine Transitions
Transitions, on the other hand, describe the conditions under which the state machine moves from one state to another. These conditions could be triggered by user input, certain events occurring in the game, or specific criteria being met. For example, a transition from the idle state to the walking state might be triggered when the player presses a movement key.
Animator
In Unity, the state machine functionality is often implemented using the Animator component, which provides an interface for creating and managing states and transitions. The Animator controller allows developers to define animation clips for each state and specify transition conditions, such as parameter values or trigger events.
State Machine in Unity

To use a state machine in Unity, follow these steps:
Create an Animator Controller

- This asset acts as the container for the state machine. It can be created by right-clicking in the Project window, selecting "Create," and choosing "Animator Controller."
Animator animator;Design States
- Within the Animator Controller, the states can be defined that represent different behaviors or conditions. Each state can have associated animation clips, variables, or parameters that control the state's behavior.
animator = GetComponent<Animator>();
animator.SetFloat("Speed", moveSpeed); // Set the "Speed" parameter to control animation speed
Define Transitions
- Specify the conditions under which the state machine transitions from one state to another. These conditions can be based on parameter values, trigger events, or script-driven logic.
animator.SetBool("IsJumping", true); // Set the "IsJumping" parameter to trigger the jumping animationImplement Actions
- Attach the scripts to the game objects that handle the actions associated with each state or transition. These scripts can modify variables, control animations, perform gameplay actions, and more.
void Update()
{
    // Check for player input and transition to the appropriate state
    if (Input.GetKey(KeyCode.W))
    {
        currentState = CharacterState.Walking;
        animator.SetBool("IsWalking", true);
    }
    else if (Input.GetKey(KeyCode.Space))
    {
        currentState = CharacterState.Jumping;
        animator.SetBool("IsJumping", true);
    }
    else
    {
        // Default state
        currentState = CharacterState.Idle;
        animator.SetBool("IsWalking", false);
        animator.SetBool("IsJumping", false);
    }
}
Test and Iterate
Play the game and observe how the state machine transitions between states based on the defined conditions. Adjust the transitions, actions, and parameters as needed to achieve the desired behavior.
Conclusion
State machines provide a modular and organized approach to managing complex behaviors in Unity games. By defining states, transitions, and associated actions, developers can create dynamic and responsive systems that adapt to player input, game events, and other conditions. Whether someone is creating character animations, AI behaviors, UI interactions, or any other game system, understanding and utilizing state machines in Unity can greatly enhance one's game development workflow.